
Mirrors do more than reflect your face, they’re one of the most versatile tools in home design. A well-placed mirror can make a cramped living room feel twice its size, bounce natural light into dark corners, and serve as a focal point that ties the whole room together. Whether someone’s working with a narrow apartment or a sprawling open-concept layout, mirrors offer practical solutions that go beyond aesthetics. This guide walks through strategic placement ideas, popular styles, and installation tips that homeowners can actually use.
Table of Contents
ToggleKey Takeaways
- Strategic mirror in living room ideas can make cramped spaces feel larger and amplify natural light by reflecting it deeper into the room rather than absorbing it.
- Position mirrors opposite windows at a slight angle to bounce south or west-facing light throughout the room, avoiding glare on screens before final installation.
- For sofas, hang a mirror two-thirds to three-quarters of the sofa width with the bottom edge 6–8 inches above the furniture to create a balanced focal point.
- Choose frameless or beveled styles for modern rooms, arched designs for mid-century aesthetics, and vintage frames or sunburst options for traditional or boho interiors.
- Always anchor mirrors over 30 pounds into wall studs or use toggle bolts rated for 50% above the mirror’s weight, and recruit help for anything over 50 pounds to ensure safe, level installation.
Why Mirrors Are a Game-Changer for Living Room Design
Mirrors manipulate light and space in ways that paint and furniture can’t. A 6-foot vertical mirror can add perceived height to a room with standard 8-foot ceilings, while a horizontal mirror stretches a narrow living room visually. The physics are simple: reflective surfaces double the light in a space by bouncing it back into the room instead of absorbing it.
From a functional standpoint, mirrors address common design challenges. North-facing rooms that never get direct sunlight benefit from mirrors placed opposite south-facing windows in adjacent spaces. Small living rooms, anything under 200 square feet, gain breathing room when a large mirror creates the illusion of depth. Even sound dynamics change slightly: hard reflective surfaces can make a room feel more lively, though this cuts both ways in spaces where echo is already an issue.
The practical benefits extend to resale value. Real estate agents frequently stage homes with mirrors to make rooms photograph better and feel more inviting during showings. According to interior design professionals, strategic mirror placement is one of the most cost-effective staging tactics for living spaces.
Beyond the spatial tricks, mirrors serve as affordable art. A $150 vintage mirror with an ornate frame can anchor a room just as effectively as a $1,200 painting. For renters or homeowners working within a budget, mirrors offer high visual impact without the commitment or cost of permanent architectural changes.
Strategic Mirror Placement Ideas for Maximum Impact
Above the Sofa or Console Table
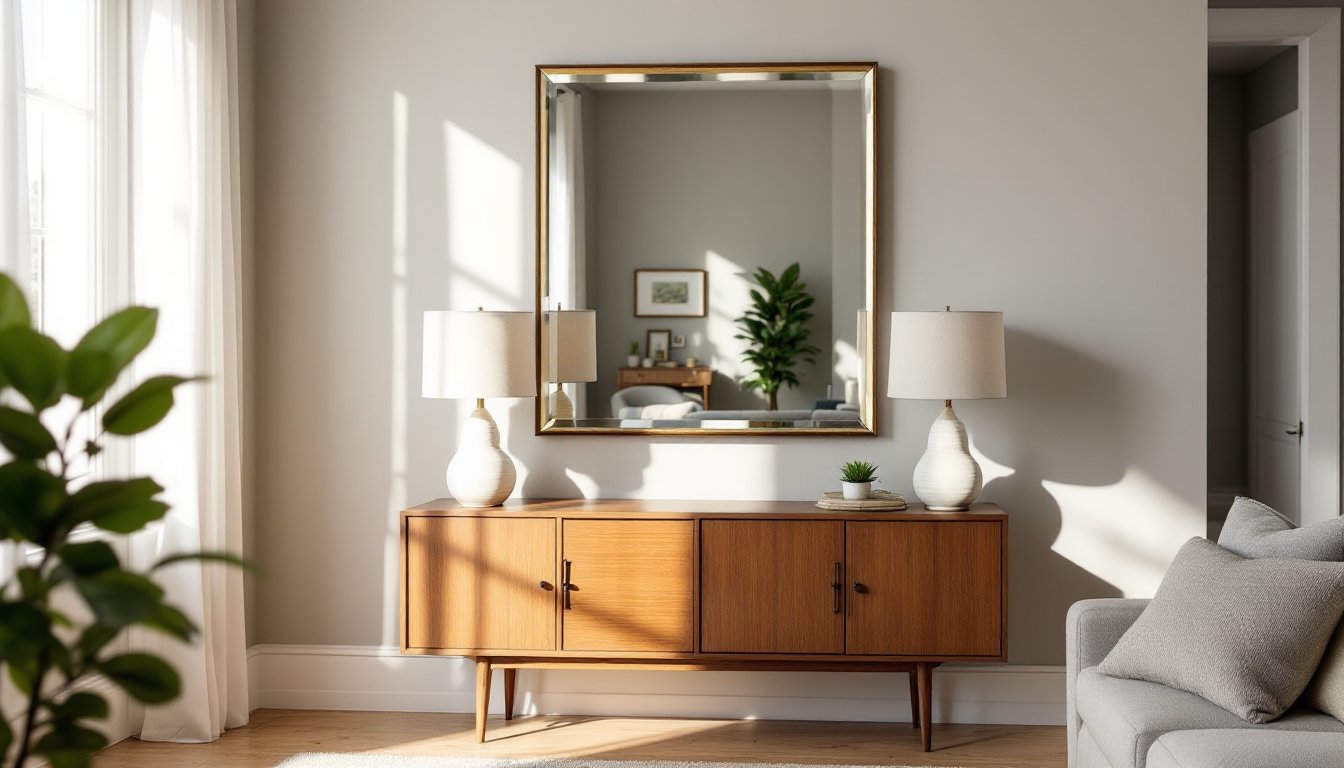
This is the most common placement for good reason, it fills dead wall space and creates a natural focal point at eye level when seated. For a standard sofa width of 72–96 inches, choose a mirror that spans two-thirds to three-quarters of that width. Going too small makes the mirror look like an afterthought: going too large crowds the furniture below.
The bottom edge of the mirror should sit 6–8 inches above the sofa back or console table surface. This gap prevents the mirror from feeling crammed against the furniture while keeping it low enough to reflect the room instead of just the ceiling. If working with a console table, leave enough clearance for table lamps, a common mistake is hanging the mirror so low that lamp shades block the reflection.
For sectional sofas or asymmetrical furniture arrangements, consider a grouping of smaller mirrors instead of one large piece. Three 24×36-inch mirrors hung horizontally can span a long wall section without the weight and installation challenges of a single oversized mirror. Make sure to use proper anchoring, drywall anchors rated for at least 50 pounds are non-negotiable for anything over 20 pounds. Toggle bolts work better than plastic anchors in drywall, and if hitting a stud, use 3-inch wood screws.
Opposite Windows to Amplify Natural Light
Positioning a mirror directly across from a window doubles the natural light bouncing through the space. This works best with south or west-facing windows that receive strong afternoon light. The mirror doesn’t need to be the same size as the window, even a 36×48-inch mirror will reflect a meaningful amount of light from a standard 36×60-inch window.
The angle matters more than most people realize. A mirror hung perfectly vertical will reflect light straight back toward the window, which doesn’t help the room much. Tilt the mirror slightly (most hanging hardware allows for minor adjustments) or position it a few feet to the side so it bounces light deeper into the room. If the mirror reflects a beautiful outdoor view, that’s a bonus, but avoid placing it where it reflects utility poles, neighbor’s siding, or other eyesores.
One caution: mirrors opposite windows can create glare on TV screens or computer monitors. If the living room doubles as a workspace or media room, test the placement at different times of day before committing to hardware installation. Many living room design resources recommend mapping light patterns throughout the day before finalizing mirror locations.
Popular Mirror Styles to Match Your Living Room Aesthetic
Frameless or beveled mirrors suit modern and minimalist spaces. The clean edges don’t compete with furniture, and the slight bevel catches light without heavy ornamentation. These typically come in ¼-inch thick glass and work well in living rooms with sleek lines and neutral palettes. Installation is straightforward, most use mirror clips or adhesive mounting tape rated for the mirror’s weight.
Arched mirrors have surged in popularity for mid-century modern and transitional living rooms. The curved top softens angular furniture and adds architectural interest without overwhelming the space. Standard sizes run from 30×40 inches up to 48×84 inches for dramatic floor-standing options. Be aware that custom arched mirrors cost significantly more than rectangular cuts, expect to pay 30–50% more for the same square footage due to the specialized cutting process.
Vintage gilt or carved wood frames fit traditional, eclectic, and maximalist interiors. Thrift stores and estate sales often have these for $50–$200, though condition varies. Check for silvering loss (dark spots where the reflective backing has degraded) and frame stability before buying. Minor silvering issues add character: widespread degradation means replacement glass, which can cost as much as a new mirror.
Sunburst or starburst mirrors work in boho, glam, or retro-inspired living rooms. These range from 24-inch diameter accent pieces to 48-inch statement mirrors. Metal finishes (brass, gold, or matte black) should match other hardware in the room, drawer pulls, light fixtures, curtain rods, for a cohesive look. Design trends showcased on platforms like Homedit highlight how metallic finishes can unify diverse decor elements.
Floor mirrors (cheval or leaning style) offer flexibility, no wall mounting required. A 65×22-inch leaning mirror can move between rooms or adjust if furniture gets rearranged. These need wall anchors or furniture straps at the top edge to prevent tipping, especially in homes with kids or pets. The International Residential Code (IRC) doesn’t mandate this for mirrors, but it’s common sense given the weight, most floor mirrors run 40–60 pounds.
Creative DIY Mirror Installation Tips for Homeowners
Before drilling anything, locate studs with a stud finder. Mark stud centers with painter’s tape, 16-inch or 24-inch spacing is standard in most walls built after 1950. For mirrors over 30 pounds, anchor into at least one stud. If studs don’t align with the desired mirror position, use toggle bolts or snap toggles rated for the mirror’s weight plus 50% as a safety margin.
D-ring and wire hanging is the most common method. Attach D-rings one-third of the way down from the top edge of the frame (not at the very top, which creates instability). Use braided picture wire, not single-strand, and loop it so there’s slight slack, this prevents the wire from snapping under tension. On the wall side, install a heavy-duty picture hanger or screw with a load rating that exceeds the mirror’s weight.
For frameless mirrors, use mirror clips (J-clips or U-clips) or construction adhesive like Loctite PL530. Clips work best for removable installations, renters should go this route. Apply adhesive in a zigzag pattern across the back of the mirror, leaving gaps for air to escape, then press firmly and support with painter’s tape or a temporary brace for 24 hours while the adhesive cures. Once cured, this bond is permanent: removal will likely damage drywall.
Safety gear for installation: Always wear work gloves and safety glasses, especially when handling large mirrors. Glass edges can slice through skin before someone realizes they’ve been cut. If a mirror breaks during installation, clean up with a damp paper towel (not a broom, which scatters shards) and dispose of glass in a sealed cardboard box labeled “broken glass.”
Leveling matters more than most people think. A mirror that’s even 1 degree off level becomes obvious once it’s on the wall. Use a 24-inch or 48-inch level and check both horizontal and vertical alignment. Mark the wall lightly with a pencil before committing to holes. If the mirror has a wire, remember that it will hang slightly lower than the hook position, pull the wire taut and measure from the wire peak to the top of the frame to calculate the offset.
For large or heavy mirrors (over 50 pounds), recruit help. One person steadies the mirror while the other checks level and marks positions. Trying to hang an 80-pound mirror solo is how walls get damaged and people get hurt. If the mirror exceeds 100 pounds, consider hiring a professional installer, the cost ($100–$200 in most markets) beats repairing drywall or worse.
Permit considerations: Mirrors themselves don’t require permits, but if installation involves cutting into walls, running electrical for backlit mirrors, or modifying load-bearing walls, local building codes apply. Most jurisdictions require permits for electrical work: check with the local building department before hardwiring anything.
Conclusion
Mirrors solve real design problems, limited light, cramped spaces, blank walls, without major renovation work. The key is matching mirror size and style to the room’s proportions, anchoring securely into studs or using proper wall anchors, and placing mirrors where they’ll reflect light or views rather than clutter. With the right approach, a mirror becomes one of the hardest-working elements in a living room.